Let’s face it: planning meaningful lessons every single day is a challenge, and sometimes you need high-quality material that doesn’t require hours to prep — especially for sub plans, early finishers, or enrichment. That’s why I want to highlight a fantastic resource for middle school science teachers: Informational Text for MS Scientific Literacy Featuring 8 Famous Scientists.
Why Informational Text Matters in a NGSS Classroom
The Next Generation Science Standards (NGSS) intentionally shift science instruction beyond rote memorization toward scientific literacy and real sense-making. That means students must not only know science content, but also engage with it like real scientists — asking questions, analyzing evidence, and interpreting explanations.
This is where informational text plays a powerful role:
Builds background knowledge and context — reading about real scientists helps students understand how scientific ideas develop over time.
Supports disciplinary literacy — NGSS encourages students to read, interpret, and use informational text as part of science learning, not separate from it.
Reinforces key science practices, like obtaining, evaluating, and communicating information, which are part of the NGSS Science and Engineering Practices.
What’s In the Resource?
This robust pack includes 8 informational reading passages + analysis worksheets — one for each of these influential figures in science and exploration:
Charles Darwin
Gregor Mendel
Amelia Earhart
Leonardo da Vinci
Mae Jemison
Louis Pasteur
Jane Goodall
Marie Curie
Each lesson is designed to take about one class period and comes in both print-and-go PDF format and editable Google Docs — perfect for differentiation or classroom management
3 Ways to Use This Resource in Your Classroom
Here’s how this resource can save you time and deepen student learning:
🎯 1. Easy Sub Plans
Whether you’re out unexpectedly or need a no-stress plan for a substitute, these ready-made informational readings give students meaningful work that’s standards-aligned, independent, and intellectually engaging. Just leave the packet and worksheets — and they’ll be reading and analyzing like scientists.
🧠 2. Early Finishers Activity
Students who finish hands-on investigations quickly often need productive extension work. Assign a scientist reading and corresponding analysis questions — it keeps them thinking critically without pulling them away from grade-level science.
✨ 3. Enrichment & Small-Group Work
These texts are perfect for small-group differentiation or enrichment rotations. Students can dive deeper into how scientists think and work, practicing evidence-based reading and writing — skills that transfer directly to NGSS performance expectations.
Final Thoughts and a Promo
Integrating informational text into science doesn’t have to be hard — and you don’t need to reinvent the wheel. Resources like Informational Text for MS Scientific Literacy Featuring 8 Famous Scientists let you blend literacy and science learning in ways that are manageable, research-based, and designed for real classrooms.
Whether you’re planning ahead or need something quick tomorrow, this resource can help you nurture scientific literacy with purpose and ease. And, for a limited time, you can score this set of 8 activities for half price. Click here for more info!
As science teachers, we know that learning should involve curiosity — questioning, exploring, and sometimes making mistakes. But in a classroom full of peers, students often hold back when they don’t feel confident. Fear of being wrong can shut down thinking and keep even bright students from participating. That’s where low-risk practice comes in.
Low-risk practice gives students a safe space to try out ideas, build confidence, and solidify understanding — without the social pressure of whole-class responses. For middle school science teachers, this means less anxiety for students and better learning outcomes for everyone.
Enter Boom Cards — a digital tool that lets students practice science concepts privately, with instant feedback, and exactly at their own pace.
What Are Boom Cards?
If you’re new to digital interactive resources, Boom Cards are self-grading, interactive task cards your students complete on devices such as Chromebooks, laptops, iPads, or phones. Students log in, practice, and receive immediate feedback on their answers.
Here’s why they’re becoming a go-to tool for middle school science lessons:
💡 Interactive & engaging — Students interact with content through drag-and-drop, multiple choice, fill-in-the-blank, and other fun formats.
⏱ Instant feedback — Students instantly see whether they’re correct and can try again if they’re not.
📊 Trackable progress — Teachers can see student performance, mastery levels, and areas that need reteaching.
🧑🎓 Low-risk environment — Students quietly build confidence without raising hands or worrying about class judgment.
If you want a deeper dive into using Boom Cards specifically in middle school science, check out this guide: Boom Cards in Middle School Science.
The Power of Private Practice
Why is private practice so important? Think about a student who almost understands plate tectonics but isn’t sure of the difference between convergent and divergent boundaries. In front of classmates, they might stay silent. But with Boom Cards, that same student can tackle a stack of interactive review questions in a risk-free way.
Here’s what makes private practice powerful:
1️⃣ Removes Fear of Public Mistakes
In science class, we want students to experiment — but they often associate risk with embarrassment. Boom Cards remove that social risk. Students practice in a no-judgment zone, which encourages trial, error, and reflection — key steps in mastering science content.
2️⃣ Increases Confidence
Because students receive private feedback and can retry answers, they build confidence with each correct response. Confidence grows quietly and meaningfully — and that confidence often starts to show up in whole-class participation later on.
3️⃣ Supports Diverse Learners
Every science class has a spectrum of learners — from those who finish early to students who need extra practice. Boom Cards let students move at their own pace so no one feels left behind or rushed ahead.
Boom Cards in Your Middle School Science Classroom
So how can you use Boom Cards today?
Here are a few simple implementation ideas:
🎯 Warm-up Practice Use Boom Cards at the start of class to activate prior knowledge — students can practice concepts while you take attendance or settle the class.
🔄 Formative Check-Ins Assign Boom Cards as quick formative checks. You’ll see instantly which students are ready to move on and who needs more support.
🏡 Homework That Isn’t Stressful Instead of traditional worksheets, assign Boom Cards for homework that feels more like play than work — and still reinforces critical science vocabulary and concepts.
Try a FREE Set of Boom Cards!
Ready to jump in? I’ve got a gift for you!
Grab this free set of Plate Tectonics Boom Cards — designed specifically for middle school Earth science review. These are perfect for low-risk practice with your students, whether you use them in class or assign them for extra reinforcement.
Tips for Success with Boom Cards
To maximize their impact in your middle school science classroom:
✅ Introduce Boom Cards with clear expectations — Show students how to log in and how feedback works. ✅ Encourage a growth mindset — Remind students that mistakes are part of learning — and Boom Cards celebrate that idea! ✅ Use data to inform instruction — Review student reports to guide your next lesson or small-group support.
Final Thoughts
Boom Cards are more than just digital flashcards — they’re a tool that empowers students to practice without fear, build true understanding, and grow confidence one click at a time. For middle school science teachers looking for engaging, low-risk practice options, Boom Cards offer a versatile, classroom-tested solution.
As the school year rolls along, one of the most fascinating Earth science topics for middle schoolers is understanding why we have seasons. It’s something students experience every year, yet the explanation involves a beautiful mix of Earth’s motion and the physics of sunlight — perfect for connecting real-world observations to deeper scientific ideas.
🌍 The Real Reason for Seasons
Many students initially think that seasons happen because Earth gets closer to or farther from the Sun. That’s a common misconception — but it isn’t the case. Seasons are caused by the tilt of Earth’s axis combined with its orbit around the Sun.
Here’s how it works:
Tilted Axis: Earth’s axis is tilted about 23.5° relative to its orbit around the Sun.
Changing Sun Angle: Because of this tilt, as Earth revolves around the Sun, different parts of the planet receive sunlight at different angles. When the Northern Hemisphere is tilted toward the Sun, it receives more direct sunlight, leading to warmer temperatures and longer days — what we call summer.
Conversely, when it’s tilted away from the Sun, sunlight arrives at a lower angle and is spread out over a larger area. This results in cooler temperatures and shorter daylight hours — winter.
Spring and Fall happen in the transitional parts of Earth’s orbit when neither hemisphere is strongly tilted toward or away from the Sun.
So the key isn’t how far Earth is from the Sun — it’s how direct the sunlight is, which changes throughout the year. This concept is crucial for students to truly understand what we experience as changing seasons.
🧠 Fun Tip: You can even have students track the length of daylight across weeks in your classroom to see this play out in real time!
9 Interactive slides that allow students to drag and drop correct answers instead of OR in addition to taking notes. This allows students to pay attention without struggling to keep up with copying notes yet they still have the interactive notes to use later as a study tool.
Self-guided exploration into refraction, dispersion, and reflection as they apply to the formation of a rainbow . Suitable for middle schoolers. 14 Google Slides, some with drag and drop features, includes an explanation of how rainbows form, review activities, and several short and easy to prep hands on activities. Suitable for at home, hybrid, or face to face classrooms.
🧪 Connecting Seasons and Light
Understanding the seasons gives students insight into how Earth’s movement affects climate and daily life. Combining that with a lesson on how light interacts with matter — like in rainbows — enriches their grasp of Earth and physical science in a meaningful, hands-on way.
For the first time since 1972, humans are leaving Earth orbit and heading back to the Moon. Artemis II isn’t about landing. It’s about proving we’re ready to go back to deep space. Artemis II will send a real crew, aboard NASA’s Orion spacecraft, on a mission that will carry them farther from Earth than any humans have traveled in more than fifty years. And even though Artemis II won’t land on the lunar surface, it may be one of the most important space missions ever flown. Apollo proved we could reach the Moon. Artemis must prove we can go back — and stay.
The first launch window for Artemis II begins on March 6, 2026, and eyes all over the world will be focused on it. Here’s a quick video to help your students understand the Artemis mission and what it means for us.
If you’re looking for a few activities to do with your students to help them understand Artemis, here are 7 you can choose from – or make a whole week of space activities to celebrate this milestone.
With the launch of Artemis II this winter, student interest in the space program is a great stepping off point for these 7 engaging activities that will take your middle schoolers 5 days to complete!
Teaching geologic time can feel intimidating—for students and teachers. Billions of years, unfamiliar vocabulary, abstract thinking… it’s a lot. Over the years, I’ve found that the key isn’t rushing through the content, but layering experiences: movement first, visuals next, practice in small chunks, and hands-on work before asking students to synthesize everything.
Here’s how I teach NGSS MS-ESS1-4 over about nine class periods, using a mix of scavenger hunts, interactive slides, partner practice, labs, and creative projects that keep students engaged from start to finish.
Day 1: Hook Them First with a Geologic Time Scavenger Hunt
Before I ever show a timeline or say the word eon, I want students moving, noticing, and asking questions.
I start the unit with this Geologic Time Stations Scavenger Hunt. Students rotate through stations, picking up bits and pieces of information about Earth’s history without being overwhelmed by structure yet. This works beautifully as:
An engaging intro for reluctant learners
A low-pressure way to activate prior knowledge
A chance for students to realize, “Wow… Earth’s history is HUGE.”
By the end of the scavenger hunt, students don’t know everything—but they’re curious, and that’s exactly where I want them.
Follow up on the scavenger hunt with direct instruction. Once students have explored, then I introduce structure using an Interactive Geologic Time Scale Google Slideshow. This slideshow helps students:
See the major divisions (eons, eras, periods)
Understand relative time (not just memorization)
Connect events to locations on the timeline
Because students already encountered some of this information during the scavenger hunt, the slideshow feels like answers to questions they already have, not a wall of new content.
Day 2: Rock Layers & Fossils as Evidence
Now we shift into how scientists know what happened in Earth’s past.
I teach a short lesson on:
Rock layers (law of superposition)
Fossils as evidence
How both help scientists reconstruct Earth’s history
Boom cards are also very low risk – wrong answers are corrected privately and students can repeat the questions until they get them all correct.
To wrap up Day 2, students work independently using a self-checking worksheet. Again, these are low risk – wrong answers are corrected privately and students can continue working to get 100%.
This combination lets students practice without constantly asking, “Is this right?”
Day 3: How Fossils Form
Once students understand fossils as evidence, they’re ready to learn how fossils actually form. I use a visual-rich slide show which covers:
Mold and cast fossils
Petrification
Preserved remains
Trace fossils
The visuals really help students distinguish between fossil types—something that’s notoriously tricky at this grade level.
Day 4: Hands-On Fossilization Lab
Day 4 is where everything clicks. We simulate fossil formation and:
Make predictions
Observe results
Connect the lab back to real-world fossil evidence
This lab is especially powerful for students who struggle with abstract concepts—they finally see how fossilization might occur.
Days 5–6: Mass Extinctions Guided Research
Now that students understand the timeline and the evidence, we zoom in on major events.
I use a Mass Extinctions Guided Research Station Activity in which students rotate through stations learning about major mass extinctions in geologic history. The guided format keeps research focused and prevents students from getting lost in the weeds.
Days 7–8: Build the Geologic Time Scale (Literally)
This is one of my favorite activities of the unit. Using adding machine tape, partners create a to-scale geologic time line.
Students are always shocked by:
How much time is packed into the Precambrian
How tiny human history is
How recent most complex life really is
It’s one thing to see a timeline—it’s another to build one across the classroom floor.
Day 9: Review Without the Groans
To wrap up the unit, I mix independent review with partner play.
Students complete a Geologic Time Color by Number. It’s calm, focused, and great for reviewing vocabulary and sequencing.
Builds from exploration → instruction → practice → application
Balances movement, visuals, labs, and creativity
Gives students multiple exposures to the same core ideas
Supports a wide range of learners without watering down content
Ends with low-stress review instead of test fatigue
If geologic time has ever felt like a tough unit to teach, this structure makes it manageable—and honestly, fun.
Geologic Time Unit: Lesson-at-a-Glance Pacing Chart
NGSS Standard: MS-ESS1-4 Total Time: ~9 class periods (45–50 minutes each)
Day
Focus
Learning Goal
Main Activities & Resources
Day 1
Introduction to Geologic Time
Students recognize that Earth’s history is vast and divided into major sections.
Hook: Geologic Time Stations Scavenger Hunt (movement-based intro) Direct Instruction: Interactive Geologic Time Scale Google Slideshow (major divisions, big ideas)
Day 2
Evidence of Earth’s History
Students explain how rock layers and fossils provide evidence of Earth’s past.
Mini Lesson: Rock layers & fossils as evidence Partner Practice: Geologic Time Scale Boom Cards Independent Practice: Self-checking worksheet or Winter Picture Reveal worksheet
Day 3
Fossilization Processes
Students identify and describe different methods of fossilization.
Direct Instruction: Methods of Fossilization Slideshow Discussion: Which fossil types form under different conditions?
Day 4
Fossilization Lab
Students model fossil formation and connect lab results to real fossils.
A 1-Week NGSS-Aligned Unit for Middle School Science
How do scientists know how old dinosaur fossils are?
Absolute dating is one of those topics that can easily become overwhelming for students—and teachers. Half-lives, radioactive decay, and calculations can feel abstract if students only see them on paper. That’s why this absolute dating unit is intentionally designed to move from direct instruction → hands-on modeling → scaffolded practice → engaging review, all while staying tightly aligned to NGSS MS-ESS1-4.
This unit gives students multiple ways to interact with the concept of determining the ages of rocks using radioactive decay, without relying on memorization alone.
NGSS Focus: MS-ESS1-4
Construct a scientific explanation based on evidence from rock strata for how the geologic time scale is used to organize Earth’s history.
To do this successfully, students need to:
Understand radioactive decay and half-life
Practice absolute age calculations
Use evidence to explain how scientists determine ages of rocks
This unit supports all three.
Day 1: Building Background with Direct Instruction
We begin with a clear, visual introduction to absolute dating. This interactive slideshow introduces:
What absolute dating is (and how it differs from relative dating)
Radioactive isotopes and half-life
Why scientists trust radiometric dating methods
The interactive format keeps students involved while ensuring everyone starts with the same foundational understanding—especially helpful for mixed-ability classrooms.
💡 Teacher tip: Pause often for think-pair-share questions to check understanding before moving on.
On Day 2, students model radioactive decay using a classic penny-flipping lab—digitally or hands-on.
This lab helps students see that:
Decay is random but predictable over time
Half-life does not mean everything decays at once
Patterns emerge when large samples are observed
This is a critical step in moving students from “I memorized it” to “I understand it.”
Optional: Add a day to graph the data! Consider graphing the number of heads and number of tails vs time. It’s also good idea to add a series for the total number of pennies – this helps reinforce the exponential aspect of decay.
Now that students understand what decay is, we focus on how scientists use it. There are four types of calculations middle school students can do:
The mini lesson walks through half-life calculations step by step, modeling the thinking process students need. Then, students practice using tiered worksheets, allowing you to:
Differentiate easily
Support struggling learners
Challenge students who are ready for more complex calculations
In my class, I have students complete a simple worksheet, check their answers, and then move on only if they mastered it. Otherwise, they see me for a mini review. Some classes need 2 days to complete this because you don’t want to rush – this is where confidence really starts to build.
Days 4–5: Stations for Mastery & Review
The final days of the unit use stations to reinforce learning through a variety of formats—perfect for engagement, differentiation, and review.
Station Options Include:
Absolute Dating Boom Cards– quick, self-checking digital practice
Absolute Dating Color-By-Number – low-stress reinforcement of key ideas
Absolute Age Riddle Worksheet– critical thinking with instant feedback
Stations give students multiple chances to revisit the same core concepts in different ways—without feeling repetitive. Allowing them to work in partners allows for differentiation as well as supporting the struggling learners.
Students leave this unit able to explain how absolute dating works, not just plug numbers into a formula.
If you’re looking for a way to make absolute dating clearer, more interactive, and less intimidating, this unit checks all the boxes.
If you’ve ever taught moon phases, eclipses, and seasons, you know how tricky these topics can be for students. They’re abstract, spatial, and full of misconceptions (“The Moon makes its own light!” “Seasons are caused by distance!”). NGSS MS-ESS1-1 can be fun and engaging, but only if you plan it right.
This 8-day lesson sequence is designed to slow things down, give students multiple ways to interact with the concepts, and build understanding through models, hands-on work, and games—without overwhelming you with prep.
Here’s how the lesson unfolds and why it works.
Day 1: Hook Students with Patterns in the Sky 🌙
We start by getting students thinking like scientists.
Warm-Up: Students observe images of the Sun, Moon, and stars taken over time. No notes yet—just noticing patterns and sharing ideas. This quick discussion surfaces misconceptions early and gives you insight into what students already believe.
Core Activity: Students begin Interactive Notebook Part 1: Moon Phases, where they record notes, diagrams, and explanations in a structured but student-friendly way. This becomes their anchor reference for the rest of the unit.
Practice: Students complete Boom Cards independently for immediate feedback. This low-stakes practice helps solidify vocabulary and sequencing without grading piles of papers. [If you’ve never tried Boom cards, they are an absolute game changer for me – read about them and try a freebie here.]
✔ Why this works: Students see patterns first, then attach vocabulary and explanations to those observations.
Day 2: Build Understanding with a Moon Phase Flip Book ✂️
Now it’s time to make the abstract visible.
Hands-On Activity: Students create a moon phase flip book, physically modeling the changing appearance of the Moon over time. This tactile experience is especially helpful for students who struggle with spatial reasoning.
✔ Why this works: The flip book reinforces the idea that moon phases are a cycle—not random shapes to memorize.
Day 3: Moon Phases in the Real World 📅
Hands-On Activity: Students complete a moon phase calendar, tracking how the Moon changes across a month. This helps connect classroom learning to what students might actually observe in the sky.
✔ Why this works: Students begin to understand that science happens over time, not just in a single class period.
Day 4: Eclipses Without the Confusion 🌑☀️
With moon phases established, students are ready to tackle eclipses.
Core Activity: Students completeInteractive Notebook Part 2: Eclipses, learning the difference between solar and lunar eclipses and why they don’t happen every month.
Reinforcement: A Color-By-Numberactivity helps students visually distinguish moon phases and eclipses while reinforcing vocabulary and concepts in a relaxed, confidence-building way.
✔ Why this works: Students already understand the positions of the Sun, Earth, and Moon, so eclipses finally make sense instead of feeling like “extra” information.
Day 5: Stations Review That Actually Feels Fun 🔄
Instead of a worksheet marathon, students rotate through review stations:
Riddle Worksheet – encourages reading carefully and applying concepts
Self-Checking Worksheet – choose the full-year version or a holiday themed option for seasonal fun – here’s a link to Halloween version.
Task Cards– quick, focused practice that encourages discussion
✔ Why this works: Stations keep energy high while allowing students to revisit the same ideas in different formats.
Day 6: Escape Room Day (Yes, Really!) 🔐
Core Activity: Students complete an Escape Room—physical, digital, or digital with Boom Cards. Each clue requires students to apply what they’ve learned about moon phases and eclipses.
Reflection: Students answer: Which clues were hardest? Why? This reflection turns a fun activity into meaningful metacognition.
Homework/Extension: A Crossword Puzzle reinforces vocabulary without feeling like homework homework.
✔ Why this works: Students are motivated, collaborative, and practicing higher-order thinking without even realizing it.
Day 7: Tackling the Science of the Seasons 🌍🔦
Now we expand beyond the Moon.
Slide Show: Students learn the science of the seasons, directly addressing the common misconception that seasons are caused by distance from the Sun.
Homework/Extension: A self-checking seasons worksheet gives students independent practice and instant feedback.
✔ Why this works: Students see, model, and explain seasons multiple times in multiple ways.
Day 8: Whole-Class Review That Feels Like a Game 🎯
Activity: A Bubble Game whole-class review brings everything together—moon phases, eclipses, and seasons—in a fast-paced, low-stress format.
Wrap-Up: Students write their own review question. This simple step reveals who truly understands the content and gives students ownership of their learning.
✔ Why this works: Review feels energetic, not exhausting—and students leave confident instead of overwhelmed.
Why This Lesson Plan Works
This sequence is effective because it:
Builds concepts gradually and logically
Uses models, hands-on activities, and visuals
Balances digital, paper, and collaborative work
Includes frequent self-checking and reflection
Keeps engagement high without sacrificing rigor
Most importantly, it helps students understand Earth-Moon-Sun relationships instead of memorizing disconnected facts.
If you’re looking for a structured, student-tested way to teach moon phases, eclipses, and seasons—without reteaching the same misconceptions over and over—this lesson flow is a game changer.
Looking for a Valentine’s Day activity that brings your class together, adds a little holiday fun, and sneaks in some review? I’ve got just the thing—a free Valentines Day collaborative coloring poster that your students will absolutely love!
This isn’t just any poster—it’s a “Bee My Valentine” themed puzzle that’s revealed only when students answer multiple-choice questions correctly. 🐝💘 Yes, it’s festive. Yes, it’s academic. Yes, it makes an adorable classroom display.
🐝 What You’ll Get:
20 printable coloring pages—one for each student (or group)
A fun Valentine’s Day image that says “Bee My Valentine”
An editable 8-question multiple choice worksheet
Color-by-code format—correct answers determine the color for each section
A teacher guide with easy setup and display instructions
🧠 The Academic Twist:
When you use this Valentines Day collaborative coloring poster with your class, each student gets one piece of the puzzle. Before they can color, they answer 8 questions on a multiple-choice worksheet that you customize for any topic you’re teaching—cells, weather, equations, grammar, you name it!
Each question number corresponds to a section of their coloring page. For example, the correct answer to Question 1 tells them what color to use in all the spaces labeled “1” on their sheet.
The best part? As the class finishes their individual pieces and assembles the poster, the full image comes together. It’s collaborative, curriculum-aligned, and visually rewarding—which is why students love it so much!
🎯 Why You’ll Love It:
Perfect for any subject—you choose the content for the questions!
Great for review, holiday stations, early finishers, or sub plans
Builds classroom community and collaboration
Adds festive décor to your classroom walls!
📥 Want to Try It?
You can grab the entire activity for free—just pop your email in below and I’ll send the Valentines Day collaborative coloring poster straight to your inbox. Whether you’re planning centers, need a sub plan, or want something festive that’s still academic, this is a resource you’ll be glad to have ready to go.
If you give it a try, I’d love to see how your students’ posters turn out—feel free to tag me on Instagram or leave a photo below!
Teaching climate change in middle school is both an opportunity and a challenge. Students are naturally curious about the world around them, but climate science can feel abstract, data-heavy, and emotionally charged. As teachers, we need lessons that are accurate, engaging, age-appropriate, and standards-aligned—without requiring endless prep time.
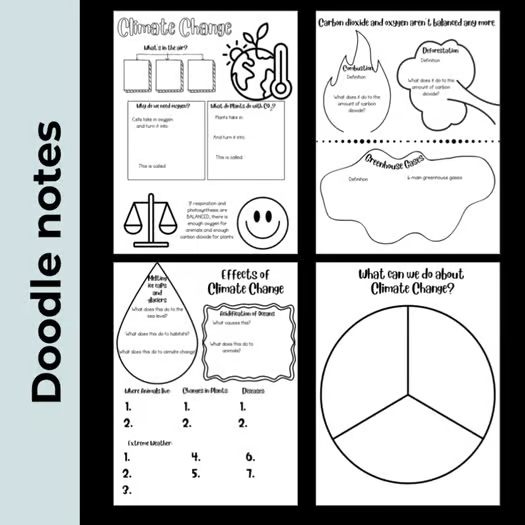
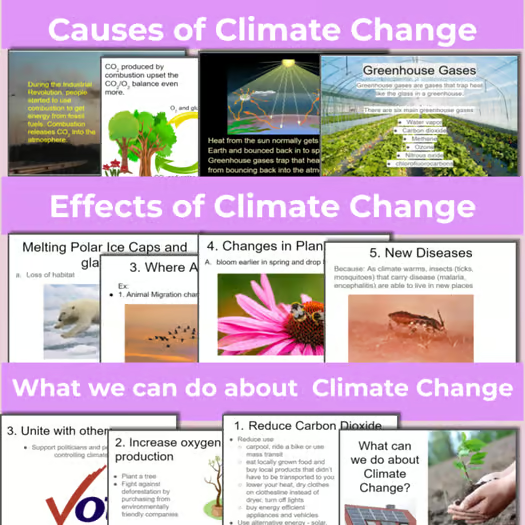
That’s exactly why I created the Climate Change 3-Week Unit for Middle School, a comprehensive, ready-to-teach curriculum designed to help students understand climate science step by step. In this post, I’ll walk you through daily lesson plans for all three weeks, explain how each activity builds understanding, and show you how to integrate free climate change resources from the blog to strengthen your instruction.
Why a 3-Week Climate Change Unit Works in Middle School
Climate change is not a single lesson topic—it’s a system of connected ideas. Students need time to build background knowledge, analyze data, and explore solutions. A multi-week approach allows students to move beyond memorization and toward scientific reasoning, evidence-based thinking, and real-world application.
This unit is designed to:
Support NGSS middle school climate standards
Balance hands-on activities, digital resources, and discussion
Scaffold complex ideas like the carbon cycle and greenhouse effect
Encourage critical thinking without overwhelming students
WEEK 1: Climate Science Foundations
Week 1 focuses on building core understanding. Students learn what climate is, how it differs from weather, and how Earth’s systems regulate temperature.
Day 1: Weather vs. Climate
Objective: Students will distinguish between weather and climate using examples and data.
Begin with a short bell ringer asking students to describe today’s weather. Most will list temperature, rain, or wind. Then ask: Is that climate?
Using guided notes and visuals, introduce the difference between short-term weather patterns and long-term climate trends. Students work collaboratively to sort examples (daily temperature vs. 30-year averages) into categories.
This lesson sets the foundation for the entire climate change unit and prevents one of the most common misconceptions students have.
Assessment: Exit ticket explaining the difference in one clear sentence.
Day 2: The Carbon Cycle
Objective: Students will explain how carbon moves through Earth’s systems.
Students explore the carbon cycle using diagrams, short readings, and guided workbook pages. This lesson emphasizes how carbon moves naturally through the atmosphere, biosphere, hydrosphere, and geosphere.
Students label diagrams, trace carbon pathways, and discuss how burning fossil fuels disrupts the natural balance. This prepares them to understand why increased atmospheric carbon matters.
Assessment: Carbon cycle diagram with written explanation.
Day 3: The Greenhouse Effect
Objective: Students will model how greenhouse gases trap heat.
Using a hands-on lab, students investigate how heat is trapped in Earth’s atmosphere. This lesson avoids fear-based messaging and instead focuses on scientific mechanisms.
Students compare Earth’s atmosphere to a greenhouse, analyze temperature data, and discuss how increased greenhouse gases change energy flow.
Assessment: Lab reflection questions and discussion responses.
Now that students understand climate systems, this lesson introduces modern climate change. Students analyze graphs showing global temperature trends and CO₂ increases, learning to read and interpret scientific data.
Discussions focus on evidence rather than opinions, helping students practice scientific literacy.
Assessment: Short written response explaining one piece of evidence for climate change.
Day 5: Review and Check for Understanding
Students synthesize Week 1 concepts through review activities, concept maps, or short quizzes. This day ensures all students are ready to move into climate impacts.
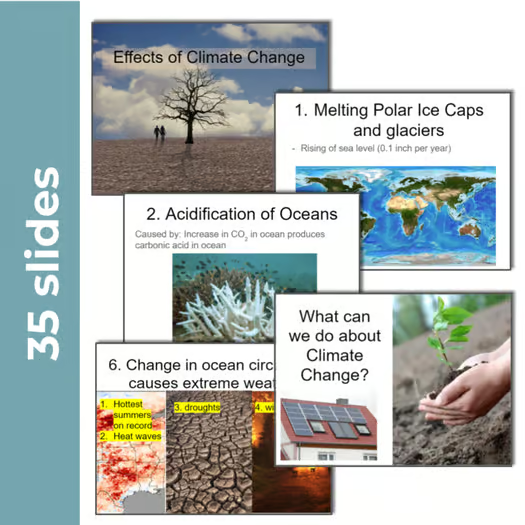
WEEK 2: Impacts of Climate Change
Week 2 shifts from systems to real-world consequences, helping students see how climate change affects ecosystems, weather, and living organisms.
Day 6: Carbon Footprints
Objective: Students will analyze how human activities contribute to carbon emissions.
Students calculate sample carbon footprints and evaluate how everyday choices—transportation, food, energy use—affect emissions. This lesson emphasizes systems thinking, not guilt.
Students discuss which changes are realistic and which require larger societal solutions.
Day 7: Climate Change Scavenger Hunt
Students rotate through10 stations exploring climate impacts such as melting ice caps, sea level rise, and ecosystem changes. Each station contains a short paragraph and a question. The answers to each question can be found at different stations. This allows students lots of movement around the classroom and the opportunity to read the 10 short paragraphs about climate change several times. As students travel around they room, they complete the answer grid which has some letters highlighted. The letters will spell out the answer to a riddle (“What do you call a flower that runs on electricity?” “A power plant.”)This interactive format supports engagement and differentiation.
Day 8: Extreme Weather and Climate Data
Students analyze graphs showing trends in heat waves, hurricanes, droughts, and precipitation. They practice identifying patterns and making evidence-based claims.
Use this 9 page student handbook to create and analyze graphs and summarize what you’ve learned.
Day 9: Population Survival Simulation
Using a simulation game, students model how species populations respond to changing environmental conditions. In this print-and-play game, students take on the role of a species facing real-world environmental changes caused by climate shifts. As they navigate extreme weather, habitat loss, and more, they’ll apply their knowledge of traits and adaptation in a fun, interactive format. This lesson connects climate change to natural selection and ecosystems, reinforcing biology standards.
Day 10: Climate Graph Creation
Students create and interpret their own climate graphs using real or simplified data sets. This lesson strengthens graphing skills and data interpretation. An optional extension activity allows students to extend their learning by illustrating the causes or effects of climate change using their graphs.
WEEK 3: Solutions and Energy Choices
Week 3 empowers students by focusing on solutions, especially energy choices and alternative energy sources.
Day 11: Introduction to Alternative Energy (Free Resources)
This is the perfect place to integrate free climate change slides and cloze notes.
Students explore renewable vs. nonrenewable energy sources, including solar, wind, hydroelectric, geothermal, and biomass. The free slides provide clear visuals, while the notes help students organize information.
Students work through digital hyperdocs investigating how solar and wind energy function, their benefits, and their limitations. This inquiry-based approach supports independent learning.
Day 13: Virtual Hydroelectric Tour
Students take a virtual tour of the Hoover Dam and analyze how water can generate electricity. This lesson helps students visualize large-scale energy systems.
Day 14: Energy Sources Challenge (Project-Based Learning)
Students apply their learning by designing an energy plan for a fictional island resort. They must justify energy choices using climate and environmental data.
This project encourages collaboration, critical thinking, and communication.
Day 15: Unit Review and Assessment
Students complete a summative assessment and reflect on what they learned about climate change, evidence, impacts, and solutions.
Final Thoughts: Teaching Climate Change With Confidence
Climate change is one of the most important topics students will encounter in middle school science. With a structured, engaging approach, you can help students understand the science, analyze evidence, and explore solutions—without overwhelm.
The Climate Change 3-Week Unit for Middle School gives you everything you need: daily lesson plans, labs, activities, projects, and assessments.
Teaching climate change in middle school can be both exciting and challenging. On the one hand, students care about the environment and want to understand real-world issues like rising temperatures, energy sources, and human impact. On the other hand, the sheer depth and complexity of climate science can feel overwhelming to teachers and students alike.
That’s why I want to help you kickstart your unit with free, classroom-tested resources and a daily lesson plan that keeps students engaged while meeting standards. Whether you’re prepping for your first climate day of the year, trying to build conceptual understanding, or just looking for meaningful ways to bring the topic to life, you’re in the right place.
👉 If you haven’t already, check out this post with two free climate change resources you can use right away — an alternative energy Google Slides presentation and editable cloze notes — as the core content for your lesson plan.
🌍 Why Start Your Unit With Alternative Energy?
Before diving deep into causes, impacts, and solutions, students benefit from a foundation in energy systems. Alternative energy — such as wind, solar, hydroelectric, geothermal, and biomass — connects directly to climate concepts because students can see how choices about energy influence greenhouse gas emissions and global warming.
These free resources give you a clean, structured starting point that:
Introduces key vocabulary without overwhelming students (terms like renewable, nonrenewable, solar, wind, biomass).
Provides visuals and discussion prompts that support varied learning styles.
Includes editable notes you can personalize for your class.
And the best part? These materials are ready-to-use today — no prep stress.
📅 Daily Climate Change Lesson Plan: Day 1
Here’s a full daily lesson (about 45–55 minutes) you can use with these freebies on the very first day of your climate change unit. It’s standards-aligned, student-centered, and built to launch inquiry and discussion.
🎯 Lesson Objective
By the end of this lesson, students will be able to:
Explain the difference between renewable and nonrenewable energy sources
Identify at least three types of alternative energy and describe how each works
Connect energy choices to climate impacts (e.g., fossil fuels vs. renewables)
This builds toward broader unit goals like understanding climate change drivers and solutions.
🧠 Lesson Flow
1. Warm-Up: Energy Brainstorm (5–7 minutes)
Prompt: “What kinds of energy do we use every day? Where does that energy come from?”
Have students quickly list sources of energy they use (think: lights, devices, cars, food, heating). Collect responses on the board under two columns: renewable and nonrenewable.
This activates prior knowledge and primes students for the upcoming content.
2. “Hook” Mini Media Clip (5 minutes)
Show a short video or animation that illustrates the difference between renewable and nonrenewable energy — or simply start with an attention-grabbing image (like solar panels vs. a coal plant).
Tip: Choose something under 3 minutes that centers on real impacts rather than abstract definitions.
After the whole-group walk-through, give students thefree cloze notes printable. As you continue the discussion, students fill in key vocabulary and concepts.
Cloze notes reinforce listening and help students focus on the most important information without copying slides verbatim. It’s also an easy assessment you can collect at the end.
5. Quick Exit Ticket (5 minutes)
Before students leave class, ask them to write one of these:
“Name one type of alternative energy and how it works.”
“Explain why using renewable energy matters for climate change.”
“List one question you still have about energy sources.”
These short reflections help you check understanding and guide your next steps.
🌱 Quick Tips for Making Climate Change Matter
Here are a few strategies that make this unit (beyond just Day 1) more meaningful:
Tap into Data & Real Evidence
When you explore climate science throughout the unit, give students access to real data trends — like global temperature change or carbon dioxide graphs. Even simple data interpretation skills help students see scientific evidence versus opinion.
Some classroom lesson sequences suggest activities where students build cause-and-effect diagrams and interpret data on greenhouse gas increases and impacts like sea level rise. Morningside Center
Connect to Current Events
Climate change isn’t just textbook stuff; it’s happening now. Integrate age-appropriate articles, recent weather events, or local environmental initiatives to make content relevant.
Include Reflection and Action
End your unit with a question: What can we do about climate change as individuals and communities?
Students can analyze carbon footprints, brainstorm solutions, or even propose projects — like energy audits for your school or a campaign to reduce single-use plastics.
Activities like a carbon footprint calculator or community action brainstorm can deepen understanding and personal agency.
🌏 What Comes Next in Your Unit?
Once you’ve grounded students in energy basics with your free slide deck and notes, you can naturally progress through a full climate change unit that includes:
The science of the greenhouse effect
Human vs. natural contributions to climate change
Impacts on ecosystems, weather, and communities
Local and global mitigation strategies
Develop lesson sequences around inquiry tasks, data analysis, project-based learning, and real-world connections to harness student curiosity.
For example, one unit sequence designed for middle school explores questions like:
How is the climate changing?
How do glaciers change over time?
What role does human activity play?
What actions can young people and societies take?
🎉 Final Thoughts
Climate change is one of those topics that students want to understand — they feel it in their communities, their news feeds, and their future hopes — but teachers need resources that make the content accessible and engaging.
By starting with free alternative energy materials and a structured lesson plan, you set the stage for deep inquiry and meaningful discussion. You won’t just deliver facts — you’ll help students build understanding, ask questions, and think scientifically about solutions.
Have you used these freebies yet? Drop a comment or tag me on social media — I’d love to hear how your class responded!